Welcome to our guide on Chicken Brooder Essentials, where we’ll explore the must-have items for raising happy and healthy backyard chickens. Let’s dive in as we uncover the secrets of heat sources, bedding, and proper nutrition for your new feathered friends.
Chicken Brooder Essentials
A successful chicken brooder requires three key components: a reliable heat source, comfortable bedding, and proper nutrition. By providing these essentials, you’ll ensure the health and well-being of your growing backyard chicks.
Choosing the Right Heat Source
Keeping your chicks warm is a priority, especially during their delicate first weeks. Different heat sources can help maintain the brooder’s temperature, ensuring your chicks grow up comfortably and safely.
Heat Lamps
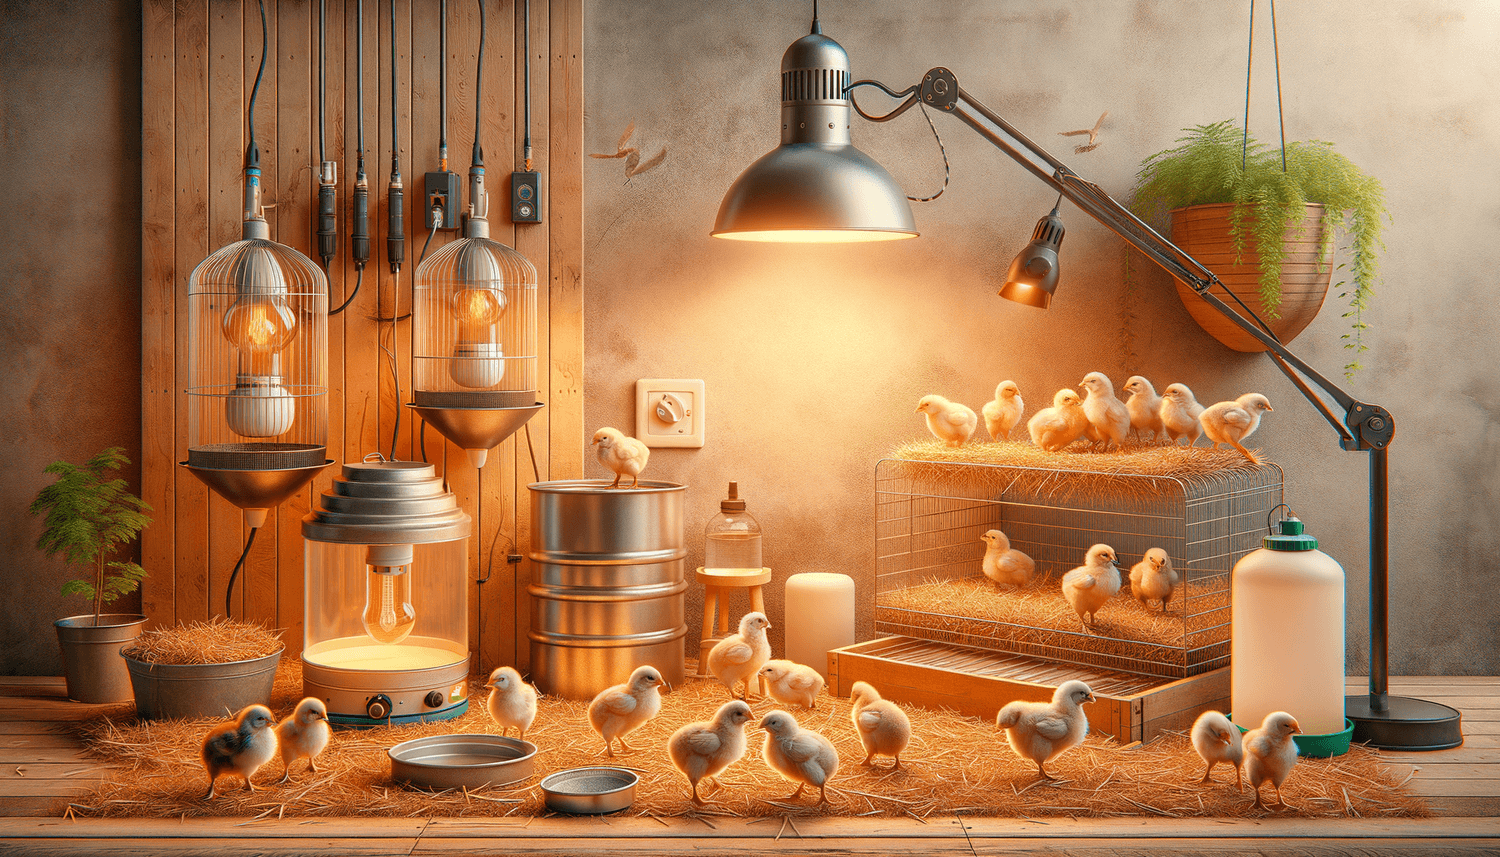
Heat lamps are a popular choice for providing warmth due to their affordability and ease of use. There are two primary types of heat lamp bulbs: red and white. Red bulbs are better at preventing issues such as feather pecking because they mask any blood. To avoid overheating, position the lamp approximately 18-24 inches above the brooder floor and use a thermometer to gauge the correct temperature.
Heating Plates
Heating plates are energy-efficient alternatives to heat lamps. They are adjustable, allowing you to raise or lower the plate to accommodate your growing chicks. Heating plates also reduce the risk of fire and provide a more natural environment, as they simulate the warmth provided by a mother hen.
Brinsea Ecoglow Brooder
The Brinsea Ecoglow Brooder is a safe and energy-efficient way to keep your chicks warm. It operates at a low wattage and radiates heat, making it safe for your flock. The brooder’s height can be easily adjusted to accommodate the rapid growth of your chicks.
Picking the Perfect Bedding
The right bedding is important for your chicks’ comfort and cleanliness. There are various bedding options available, and each has its set of pros and cons.
Pine Shavings
Pine shavings are the most widely used bedding choice for chicken brooders. Not only do they provide excellent absorbency, but they are also biodegradable, making them an eco-friendly option. Avoid using cedar shavings, as they can be toxic to chicks.
Straw or Hay
Straw or hay are natural, cost-effective options for brooder bedding. However, they can sometimes become moldy and may be harder to clean than other alternatives.
Newspaper or Paper Towels
Newspaper or paper towels are an inexpensive and readily available option for bedding. They are easy to change and provide good traction for your chicks. However, they may not be as absorbent as other types of bedding.
Providing Proper Nutrition
Feeding your chicks the right diet promotes optimal growth and health. Begin with a starter feed and transition to grower feed as they age.
Starter Feed
Chicks require a high-protein diet during their first weeks of life. Beginning with a starter feed that contains 20-22% protein will ensure your chicks receive the nutrients they need. Purchase non-medicated starter feed if you plan to raise organic chickens, or medicated feed to help protect your chicks from potential diseases.
Grower Feed
After four weeks, your chicks’ need for protein decreases. Transition them to a grower feed containing 16-18% protein. The grower feed provides essential nutrients to support their continued development.
Scratch Grains
Scratch grains are a complementary treat that can be offered in addition to grower feed. These grains, such as corn or barley, provide entertainment for your birds and aid in digestion. However, they should only make up a small portion of your chickens’ diet, as they lack essential nutrients.
Accessories for a Thriving Brooder
While heat, bedding, and nutrition are essential, there are additional accessories that will maximize your chicks’ comfort and happiness.
Waterers and Feeders
Choose waterers and feeders that are chick-sized and easily accessible. It’s essential to use waterers that are difficult to tip over to prevent water spills and damp bedding. Keep the feeders clean and consider hanging them to prevent waste.
- Tip: To minimize the risk of drowning, add clean marbles or pebbles to the waterer. This prevents the chicks from accidentally submerging themselves in the water.
Thermometer
A thermometer is essential for monitoring your brooder’s temperature. Make sure to adjust the heat source as the chicks grow to maintain the recommended 95°F for the first week of life, decreasing by 5°F each week until the chicks are ready for outdoor temperatures.
Perches
Offering perches in the brooder encourages natural roosting behaviors. You can use wooden dowels or branches to create appropriate perches for your growing flock.
Chicken Toys
Chicks love to play and explore! Providing toys and activities, such as mirror toys or treat balls, keeps your chicks entertained and prevents boredom-related issues, like pecking or feather pulling.
Creating a Secure Environment
A secure brooder is crucial to protect your flock from potential dangers in their environment.
Secure the Heat Source
Ensure that the heat source is securely attached and not at risk of falling into the brooder or starting a fire. Regularly inspect cords and attachments for damage and signs of wear.
Provide a Lid
A wire mesh lid allows for temperature control while also preventing escapes or predator access. Make sure the lid is securely fastened and allows for proper ventilation.
Safe Location
Choose a brooder location that is safe from drafts, flooding, and other environmental hazards. Keep the area clean and free of potentially dangerous substances or objects.
Maintaining a Clean and Healthy Brooder
Keeping your brooder clean is essential for the health and happiness of your chicks.
Regular Cleaning
Perform daily spot cleaning to remove soiled bedding and any spilled food or water. Replace the bedding fully each week to maintain a hygienic environment.
Air Quality
Ensure proper ventilation is in place to prevent ammonia buildup in the brooder. Ammonia can cause respiratory issues, so regularly monitor the brooder’s air quality and make necessary adjustments when needed.
Quarantine New Birds
When introducing new birds to your flock, quarantining them for a minimum of 14 days will decrease the risk of disease transmission. This precaution ensures the new arrivals do not bring infections or parasites into your established flock.
By providing essential heat sources, comfortable bedding, proper nutrition, and additional accessories, your chicken brooder will be the perfect environment for your flock to grow up happy and healthy. Caring for your chicks is a rewarding experience, and with the right essentials in place, you’re laying the foundation for a successful backyard chicken experience.
Monitoring Chick Health
Keeping a close eye on your chicks’ health is crucial for maintaining a thriving, happy flock. Be vigilant for signs of illness or injury, as early intervention can make all the difference.
Common Illnesses
Chicks, like all living creatures, can become ill. Diseases such as coccidiosis, respiratory infections, and other common illnesses can negatively impact your flock. If you notice any signs of sickness, such as lethargy, discharge from eyes or nostrils, or a decrease in appetite, consult a veterinarian for appropriate treatment options.
Pasty Vent
Also known as pasting up, pasty vent is a condition where droppings stick to the chick’s vent opening, which can cause blockage and pose a health risk. Regularly check your chicks for this issue and gently remove any buildup with a warm, damp cloth.
Curled Toes
Curled toes are a common condition in newborn chicks, where their toes curl under instead of lying flat. Providing a non-slip surface in the brooder, such as textured paper towels, can help alleviate this issue. In some cases, corrective shoe devices may need to be made and applied to ensure the chick’s feet develop properly.
Integrating Chicks into Your Existing Flock
As your chicks grow, there will come a time to integrate them into your existing flock. It’s essential to go through this process gradually and methodically to prevent stress and aggression.
Size Considerations
Wait until your new birds are nearly the same size as your existing flock before attempting to integrate them. This size similarity can help reduce the likelihood of bullying and injury.
Gradual Introduction
Introduce chicks to the rest of the flock gradually over a few weeks. Start by allowing them to see each other through a barrier, such as a wire fence or pen, so they can become familiar with one another without direct contact.
Mixing Flocks
After the gradual introduction phase, start integrating the new birds into your existing flock. Allow them to free-range together and share nesting boxes, perches, waterers, and feeders. Keep a watchful eye for signs of aggression and separate any overly aggressive hens temporarily if necessary.
By carefully monitoring your chicks’ health and navigating the integration process, you ensure a happy and harmonious flock ready to thrive in your backyard. With the right essentials and knowledge, raising backyard chickens will be a rewarding and enriching experience.
Frequently Asked Questions
Let’s address some of the most common questions that backyard chicken owners might have when setting up a chicken brooder. These answers will expand your knowledge and help you make informed decisions about your flock’s care.
What is the ideal temperature for a chicken brooder?
The ideal temperature for a chicken brooder is 95°F during the chicks’ first week of life. Reduce the temperature by 5°F each week until the chicks are ready to withstand outdoor temperatures.
How long do chicks need to stay in a brooder?
Chicks should stay in a brooder until they are 5-8 weeks old, depending on the outdoor temperature and their ability to maintain body heat on their own.
Do chicks need a light during the night?
Chicks do not necessarily need light at night but require a consistent heat source. Red heat lamps can provide warmth and a dim light to help them feel secure.
What can I use as a brooder for my chicks?
You can use plastic storage containers, galvanized stock tanks, or wooden crates as a brooder for your chicks, as long as they are spacious, clean, and provide proper ventilation.
How often should I clean the brooder?
Daily spot cleaning of the brooder is necessary to remove soiled bedding, spilled food, and water. Perform a complete bedding change each week for optimal hygiene.
How can I prevent my chicks from developing pasty vent?
Monitor your chicks regularly for pasty vent and gently remove any blockage with a warm, damp cloth. Providing clean water, maintaining brooder hygiene, and keeping the temperature regulated can also help prevent this issue.
How much space do chicks need in a brooder?
Each chick requires a minimum of 0.5 sq ft of space during the first two weeks of life, which should increase to 1 sq ft per chick as they grow.
When can I introduce treats or scratch grains to my chicks?
You can introduce treats or scratch grains to your chicks when they are about four weeks old. However, these should account for only a small portion of their diet, supplementing the proper grower feed.
Can I keep different breeds of chicks together?
Yes, you can keep different breeds of chicks together in the brooder, as long as they have similar growth rates and care requirements. Monitor them closely to ensure harmony among the various breeds.
Can I introduce older chicks to younger ones?
Yes, you can introduce older chicks to younger ones but do so gradually and with supervision. Ensure that the older chicks are not aggressive or causing harm to the younger ones.
Do I need to vaccinate my chicks?
Depending on disease risks in your area, vaccinating your chicks against specific illnesses like Marek’s disease might be advised. Consult a veterinarian for appropriate vaccination guidance based on your location and flock needs.
When should I switch from starter feed to grower feed?
Transition your chicks from starter feed, which contains 20-22% protein, to grower feed, containing 16-18% protein, when they are four weeks old.
When can I let my chicks outside?
You can let your chicks outside for brief supervised periods when they are 3-4 weeks old, provided the outdoor temperature is warm and it’s a calm, sunny day. Always monitor the chicks carefully to prevent overexposure to cold or potential dangers.

